5 Common mistakes when performing Spirometry

Spirometry is the most commonly performed test of pulmonary function and it plays a central role in the diagnosis and surveillance of respiratory disease.  Accurate spirometry testing, interpretation, and follow-up are vital to ensure patients are diagnosed correctly, placed on the correct treatment pathway and monitored effectively. 

Although the principles for achieving accurate and repeatable testing seem simple, performing accurate testing has many obstacles some of those most common are outlined below.


Patient demographics

It’s vitally important when performing spirometry that the correct demographics’ information is obtained prior to starting the test. This includes the patient’s date of birth, birth gender, height, weight and ethnicity. 

It is important that all this information is recorded correctly as it will have a significant impact on the interpretation of the test. In some centres with busy clinics, patients’ height may be measured with shoes on, or be estimated by the patient. This will give false predicted values and have an adverse effect on the interpretation, whereby you are most likely to see a false-positive result. Patients who are unable to stand should have their height estimated by the correct arm span equations.

The birth gender and date of birth are also crucially important, but common mistakes when performing Spirometry include the gender being input incorrectly. It’s extremely important this information is checked by the performing physiologist and/or health professional, prior to starting the test.

Confirming the patients’ ethnicity is also important, as the Global Lung Initiative have further developed correction values related to ethnicity, which should be available within your Spirometry software. 


Calibration

Calibration is vitally important when performing measurements of flow and volume, regular and accurate calibration helps those performing spirometry trust the results generated.

Formally calibration is the process for establishing the relationship between sensor-determined values of flow or volume and the actual flow or volume. A 3-L calibration syringe is used to carry out calibration checks, this is the process used to validate that the device is within calibration limits, e.g. ±3% of true value. Calibration checks must be undertaken daily or more frequently if there are large temperature changes within the test area or if specified by the manufacturer.

To help reduce test errors, a calibration log should be recorded, and equipment which cannot successfully be calibrated should not be used. Biological controls, whereby a member of the laboratory staff regularly performs spirometry, helps further reduce the risk of equipment or calibration faults. There are also devices now available which are supplied with pre-calibrated flow sensors which saves valuable time within buy clinics, these can be verified by using the calibration syringe to maintain Quality Control.


Hesitation and or Slow start

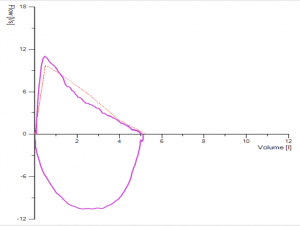
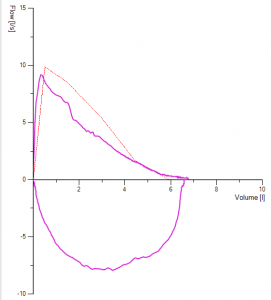
Spirometry is a test of maximal effort, therefore, a slight hesitation or a delayed start can affect results, and so is one of the common mistakes when performing Spirometry. A hesitation in blowing out before the initial blast affects most spirometry test results early in the manoeuvre. Similarly, a test which is performed slowly or in a will have a delayed peak flow and in circumstances will falsely elevate the FEV1 – affecting test interpretation.

A manoeuvre showing these errors must not be used to measure  FEV1, but it may be used to validate the FVC  if it is consistent with other acceptable but less than perfect curves.

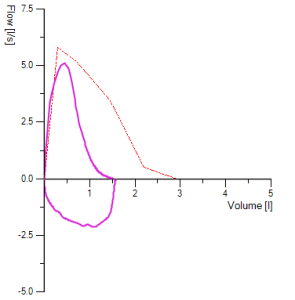
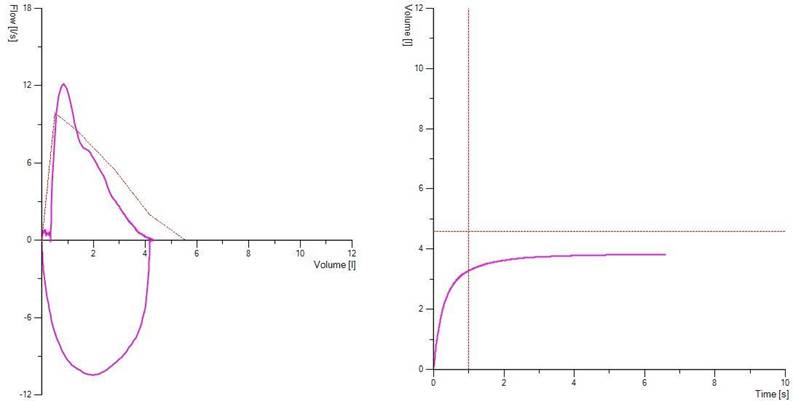
Since hesitation and or a slow start occurs early in the test, it is most easily seen in the flow-volume curve, which has its peak flow displaced to the right. 

Hesitation can falsely elevate the FEV1 and allow for misinterpretation of the flow-volume loop. 

In instances where this occurs, the subject/ patient should be asked to blow immediately or encouraged to blow with more force.

a.)   Flow volume loop
b.)flow volume loop

Figure 1. Demonstrates a clear hesitation before exhalation in picture a) due to the patient breath-holding before blasting out and in b) slow to reach peak flow. Both types of errors will affect FEV1 and these traces as such should be discarded  


Test selection

Common mistakes when performing Spirometry include incorrect test selection. This is made whereby non-acceptable or non-repeatable manoeuvres are selected, this error can often be made by novices or those who perform spirometry infrequently.

This can happen when those performing the test are more focused on the numerical data and not the flow-volume curve.

With changes in technology, the use of flow-volume curves is commonplace, but some centres may still use volume time curves (whereby cough can be less easily identified).

Poor test selection can quite often lead to false-negative or false-positive results. If you see the result below here, FEV1 is performed within ATS criteria for reproducibility, but we see an unacceptable manoeuvre with cough present, which has the highest FEV1. The selection of tests should not solely be focused on the highest attained numbers for FEV1 and FVC but should be performed with technically accepted manoeuvres free from significant artefact.   

flow volume loop

Figure 2. Demonstrates three manoeuvres with reproducible numbers for FEV1, however, the best-selected test had a cough – and it’s not a technically acceptable test the numbers for this although the best attained should not be used.


Glottis  Closure or  Breath Holding            

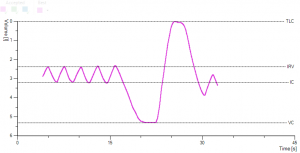
Commonly you can see airflow during exhalation suddenly cease before the lungs have been completely emptied.

Closing the vocal cords (glottis closure) and breath-holding both causes the volume-time curve to show an abrupt horizontal line. The flow-volume curve drops sharply to zero flow. This is another common mistakes when performing Spirometry.

The FVC is falsely reduced and may be misinterpreted as indicating a restrictive impairment. In addition, the FEV1/FVC ratio may be falsely elevated, resulting in a normal FEV1/FVC ratio even hiding a potentially obstructive impairment. Aside from this as the patient continues to blow there would be a distinct loud noise as the patient attempts to carry on blowing through a closed glottis. 

Glottis closure may be involuntary and should be documented when it cannot be corrected.  However, for breath-holding, it’s important to coach the subject/patient to blow ‘UNTIL TOLD TO STOP’, or encouraged to relax the throat and squeeze from the diaphragm until empty, glottis closure can be difficult to correct, a slow vital capacity may be beneficial and help validate vital capacity. 

flow volume loop

Figure 3. Demonstrates glottis closure, seen by a sudden drop in the flow volume loop to 0 flow and in the volume time graph by a distinct plateau. Here we can see the patient had attempted to carry on the blow this would most likely be a noisy part of the manoeuvre.


Want to Learn More?

If you are interested in finding out more about our range of Spirometry and PFT products, why not drop our sales team a message at sales@lovemedical.com or give us a call on 0161 976 2744 and one of our team will be happy to talk to you!



What is Spirometry?

spirostik

Spirometry is considered a method of assessing Lung Function by measuring the “useful” volume of air in a patient, in simple terms, it is a dynamic breathing test to look at how much air an individual can inhale and exhale and how fast this can be done. Spirometry  is used to help monitor and diagnose asthma and chronic obstructive pulmonary disease (COPD) as well as several other conditions which affect breathing, and may also be used to monitor the effect of any treatments for chronic lung conditions. 

Spirometry systems are generally available as handheld devices and desktop-based devices which are generally more sophisticated and give more detailed results.


Indications for Spirometry

Some of the reasons why an individual may be referred for a spirometry test include: 

  • Persistent cough
  • Increased phlegm
  • Shortness of Breath
  • Dyspnoea
  • Wheeze 
  • Two or more chest infections over 12 months
  • Increase or change in respiratory symptoms
  • History of smoking + symptoms >35yrs of age
  • History of childhood asthma + symptoms
  • Significant occupational history + symptoms


Why is Spirometry used?

A Spirometry test may be performed to assess any signs or symptoms that may be caused by a chronic lung condition as it can help tell if narrowed or inflamed airways are obstructing your breathing. Conditions such as:

If a chronic lung condition has already been diagnosed, Spirometry may be used periodically to check the efficacy of medications and to monitor and control breathing problems. Spirometry may also be used before any planned surgery to check lung function is adequate for the rigours of an operation and is also being used within occupational health to screen for occupational-related lung conditions.


What does Spirometry involve?

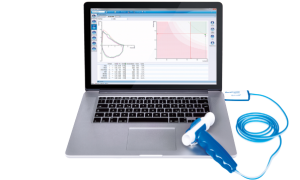
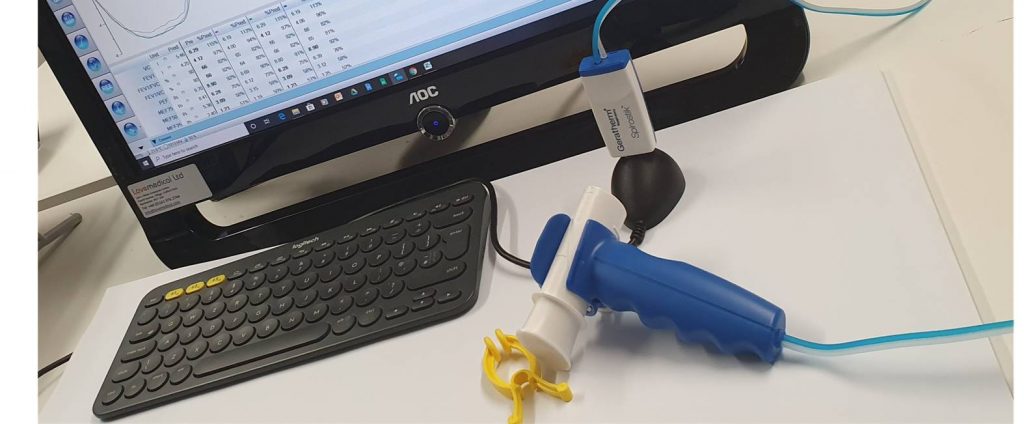
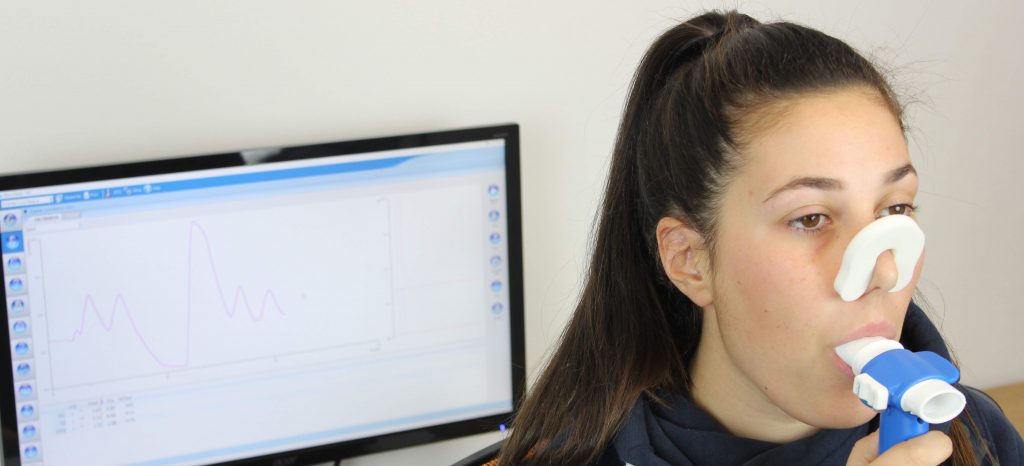
Spirostik USBSpirometry manoeuvres should be performed with the subject in a sitting position, and the tests require the subject to breathe through a flow sensing device in several predetermined manoeuvres. The patient should use a nose clip to ensure air is blown through the mouthpiece.
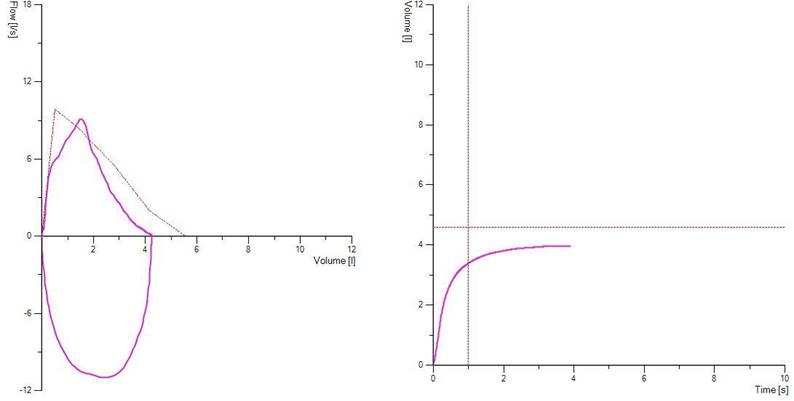
The spirometry test involves 2 main parts, the first is a Relaxed or Slow Vital Capacity (SVC) test, which involves taking 3 tidal breaths followed by a big breathe in and then a long steady blow out until the subject’s lungs are empty. 

The second part is Forced Vital Capacity (FVC) test, which involves taking 3 tidal breaths followed by a big breath in and a hard and fast blow out until the lungs are completely empty. Each part should be repeated 3 times to ensure consistent results.

The patient may then be asked to perform a reversibility test to test an inhaler or another form of medication to see if this improves the patient’s breathing.


What does Spirometry measure?

Slow Vital Capacity (SVC) – This is the amount of air the patient can blow out during the relaxed manoeuvre.

Slow Vital Capacity (SVC)

Forced expiratory volume (FEV) – This is how much air the subject can force from the lungs it is usually expressed as FEV1 the amount of air that can be exhaled in one second. This measurement helps assess the severity of breathing problems. Lower FEV-1 readings may indicate a more significant obstruction.

Forced vital capacity (FVC) – This is the largest amount of air that can be forcefully exhaled after a single deep breath. A lower than normal FVC reading may indicate restricted breathing.

By looking at the curves created by the software, it is possible to understand the problems the patient may have. They usually follow one of 3 patterns, normal, obstructive and restrictive.

Normal – Results are within a normal range based on the reference values for someone with the patients demographic.

normal air flow
Normal flow loop

Obstructive – When air flows out of the patient’s lungs slower than it should (low FEV1) an obstructive pattern is seen, this is caused by conditions which narrow the lungs airways such as asthma and COPD. 

Obstructive Flow Loop

This can then be graded according to the severity with the help of a reversibility test.

Mild 

FEV1 80%+ Predicted value

Moderate

 FEV1 50-79% Predicted value

Severe

 FEV1 30-49% Predicted value

Very Severe

 FEV1 > 30% Predicted value


Restrictive – When there is a reduction in the amount of air you can breathe in, but the speed in which you breathe out is preserved, a restrictive pattern is seen. Conditions such as Pulmonary Fibrosis which affect the lungs ability to expand and hold a normal amount of air could be the cause, although this can also be seen in obese patients.

Restrictive Flow Loop

Occasionally both obstructive and Restrictive patterns can be seen in patients with severe emphysema or cystic fibrosis.

Depending on the spirometry results patients may be sent for further lung function testing, such as lung volumes which could be done via Body Plethysmography, Helium Dilution or Nitrogen Washout, or a Diffusion test.


Are there any risks to Spirometry tests?

Spirometry is generally a safe test. The subject should perform the test from a sitting position, in the event that the subject feels a shortness of breath the sitting position prevents falls.

As some of the tests requires some exertion, it isn’t generally performed in subjects who have had a recent heart attack or some other heart condition. Rarely, the test may trigger severe breathing problems.


Want to Learn More?

If you are interested in finding out more about our range of Spirometry and PFT products, why not drop our sales team a message at sales@lovemedical.com and one of our team will be happy to talk to you about how we can help!

5 common mistakes made when performing a CPET Test

When performing a Cardiopulmonary Exercise Test (CPET), the most important thing is making sure that the results are reliable for them to be accurately interpreted later on. A mistake made during the test can dramatically affect the interpretation and therefore, the prognosis. For this reason, we wanted to highlight some of the most common mistakes we see people make and the problems they can cause when coming to interpret the data.


Mask Fitting

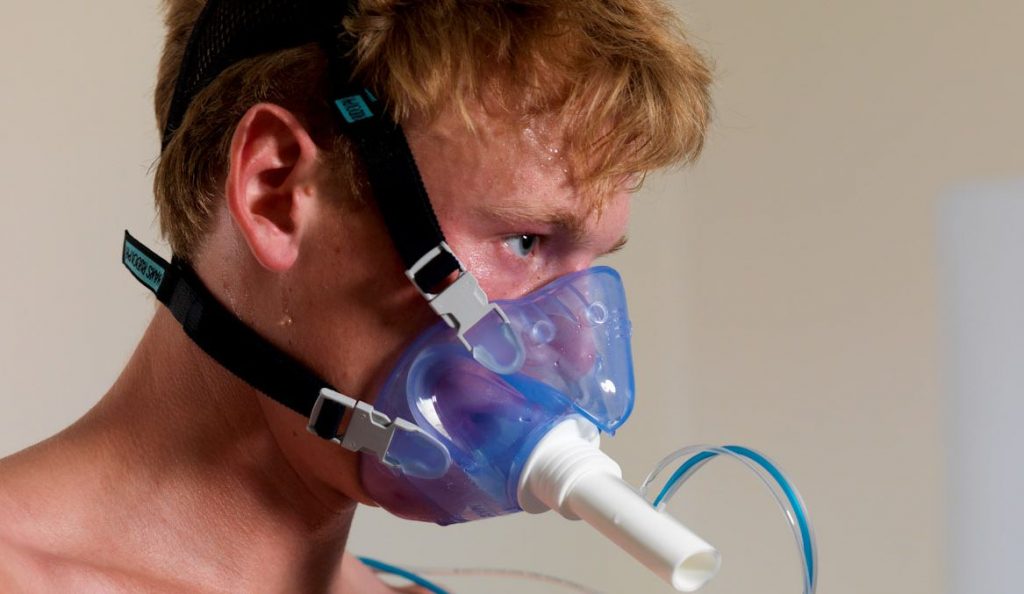
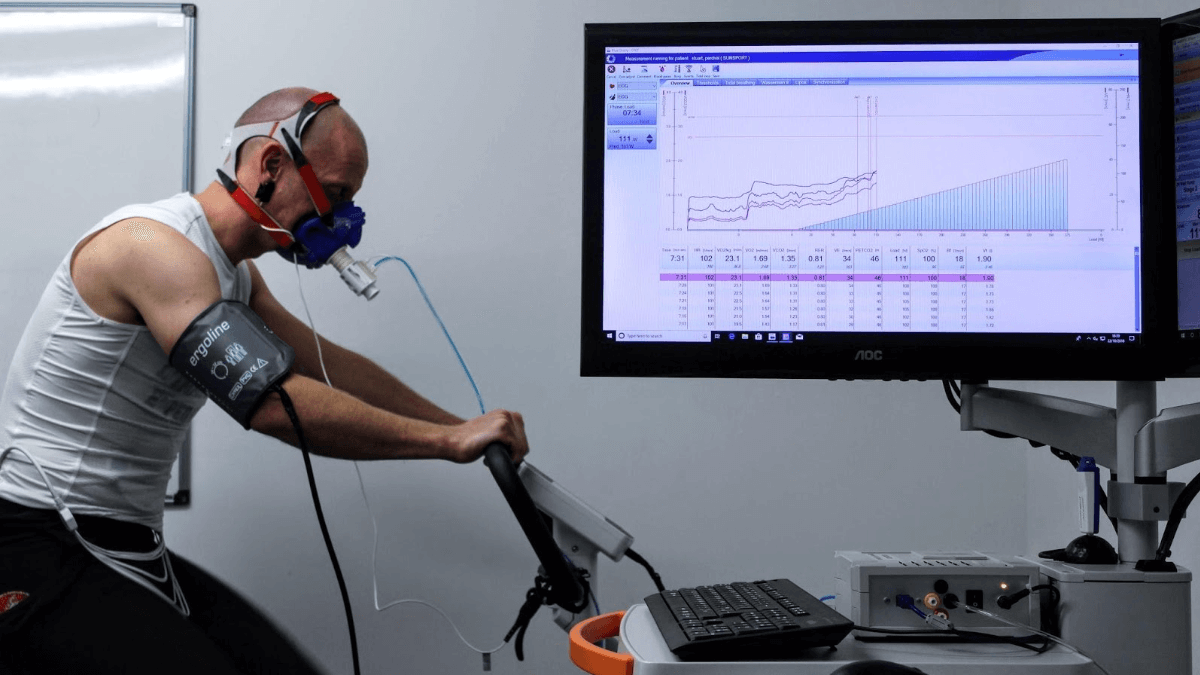
It is vital when performing a cardiopulmonary exercise test (CPET) test that there are no leaks in the breathing circuit. In general, machine leaks will be detected during the calibration and validation processes. However, a common cause of leaking can be the seal between the patient and the flow device.

For a long time, CPET testing was performed using a mouthpiece and nose clip. On the surface, this method provides a good seal and historically with the heavyweight of flow valves. Headgear was used to support the apparatus, so the mouthpiece worked, albeit giving a rather messy result at the end of the test due to the build-up of saliva.

More recently, the mask has become the favoured method of connection to the system. The patient is able to breathe through both the nose and mouth and can swallow. Therefore, much less saliva is built up, and there is less mess.

It is critical, however, to ensure that the mask is providing a leak-free seal around the patient’s nose and mouth. First ensure you pick the correct size of mask, test fit where necessary to make sure the fit looks good. After securing the mask with the correct headgear, you need to check for a leak. Simply occlude the breathing port at the front of the mask briefly and ask the subject to inhale, making sure pressure isn’t applied to the mask. It should be sucked onto the patient’s face if no leaks are present. Reverse the process asking the subject to exhale, at which point there should be an overpressure leak once the mask is filled.

A mask leak during the test is one of the biggest problems for interpretation. It’s therefore essential to check the VO2 and VCO2 values before and during the test. The Love Medical CPET system uses the Blue Cherry software, which allows a period just before commencing the test where data can be seen to check for leaks or hyperventilation. This data is deleted as the test is started to prevent these issues from causing a problem during interpretation. Check with your CPET system provider to see if this feature is available on your software.

This short test, prior to performing the main test, will prevent wasted results and test time later.


Exercise Protocol

Choosing the exercise protocol can be a difficult concept when first starting to perform a cardiopulmonary exercise test (CPET) test. How many watts per minute for the ramp seems like an arbitrary calculation, is the person fitter than expected? Do they have a more sedentary lifestyle?
There is a recognised equation for calculating the work rate increment, commonly known as the Wasserman equation from the book Principles of Exercise Testing and Interpretation.


The Wasserman equation:

1. Determine the expected VO2 max for the patient in ml.min-1

2. Calculate and subtract the unloaded oxygen requirement:
VO2unloaded = (5.8 x BW) + 151

3. Where VO2 is expressed in ml.min-1 and BW is body weight in Kg

4. Divide the remainder by 103. This divisor represents the product of the expected oxygen cost of leg cycling (10.3 ml.min-1.W-1) and the optimal test duration (10 min).

5. The resulting quotient represents the desired work rate increment per minute:
Work rate = (Predicted VO2max – VO2unloaded)/103


If you find this too difficult to calculate, there is a possible shortcut. Many systems will calculate the maximum workload for a given patient data. The Love Medical ECG system, for example, has a choice of several equations to calculate this max load. Simply take this max load value and divide by 10, giving you an approximation of the required workload ramp.

A CPET test should last between 8 and 12 minutes. Should the patient not be quite fit enough for the ramp, they should still be able to reach 8 minutes. If the calculation has underestimated their fitness level, then the test should still be finished within 12 minutes. In either case, they both fall within the test time recommendations.


Cables and tubes

Poor management of cables and tubes during an exercise test causes mistakes, not least damage to the device or injury to the patient. To a trained eye, these problems are easy to prevent. In fact, to the layperson, cable routing can often look precarious. It’s all too easy for newcomers to cardiopulmonary exercise test (CPET) testing to miss problems, having so much to think about while setting up the test.

Always ensure flow tubes and ECG cables are routed up and away from the cycle pedals, as getting a tube caught at 60 RPM will likely cause damage. Ensure cables are routed to allow the patient to dismount without becoming tangled, again it’s easy to damage a cable with a patient desperate to get off the bike.

When routing the sample tube, in particular, the gas sample tube, ensure it comes up from the flow sensor. This will reduce the risk of moisture ingress from saliva during the test. It’s often easy to secure the sample tube using the headgear from the mask.

Always ensure connecting cables such as power leads and ergometer control leads are routed to avoid trailing across the floor. This reduces trip hazards and prevents injury or damage.

Finally, it is a good idea to remove as many cables as possible. Newer systems are designed to make use of things such as Bluetooth control for ergometers, pulse oximeters, and even ECG. This means no wires are crossing the field of the test. The Love Medical System now makes use of Bluetooth technology. This leaves only the flow tube and the gas sample line. It can be secured in the patient’s headgear, so it’s up high and away from danger for the period of the test.


Blood Pressure cuff

Fitting the blood pressure cuff should be a simple procedure. However, like so many of the operations surrounding the cardiopulmonary exercise test (CPET), it is complicated due to the number  of tasks involved in preparing a subject for testing.

Some people still choose to perform a manual blood pressure using a sphygmomanometer and a stethoscope, but as technology moves forward, it is becoming increasingly popular to automate the process. This allows better focus on the patient by the tester rather than a rush to collect BP results.

When using an automatic Blood Pressure device, it’s important to ensure that the BP cuff is the correct size. If it’s too small, you can hurt the patient, too big, and you may not get any values from the BP machine. Once this is done, ensure that the microphone covers the brachial artery as the cuff is positioned on the arm. This will ensure the correct signal required by the device. Take a little time over this step to ensure it’s working well; it’s much harder to correct during the test.

Perform a test measurement at rest and ensure the results are what is expected, and the system should be ready to test.


Saddle height

Setting the saddle height of the ergometer is simple enough, as lots of ergometers have a manual adjustment. This consists of adjusting the saddle height without the subject in position and then getting the subject onto the ergometer to check it. When pedalling, the subject’s leg on the downstroke of the pedal should not be fully extended. This should provide optimum comfort during the test.

However, manual adjustments mean that there’s room for human error. If the initial adjustment attempt is not correct, the subject has to stand on the pedals before the test to make the final adjustments. This can be both uncomfortable and dangerous for the subject.

Many systems now employ a fully electronic saddle height adjustment, allowing the saddle height to be fully adjusted with the subject sat in place. This method also gives a value to the actual height, making it much easier to reset to the correct height for any future test. Furthermore, the electronic adjustment on the Love Medical Ergometers allows the saddle to be adjusted with the patient in situ, making the whole operation much safer.

Let us know if you agree with our list or if you think there’s something we missed!


Want to learn more?

We run a number of CPET Interpretation training courses each year which suit all levels and areas of speciality. If you are keen to learn more about performing and interpreting CPET, why not drop us an email to education@lovemedical.com to find out when our next course is.

What is Cardiopulmonary Exercise Testing?

Cardiopulmonary Exercise Testing

Cardiopulmonary Exercise Testing (CPET) is a diagnostic test which looks at the heart and lungs of an individual during exercise. The human body is designed with vast reserves, and many illnesses or problems cannot be detected at the rest state. By putting the body under stress during exercise, we can recognise some of these conditions.

The CPET test is one of the most powerful non-invasive diagnostic tests available in modern medicine. CPET has been utilised for many years within respiratory medicine as a differential diagnosis for shortness of breath, allowing the physician to determine if it is of Cardiac or respiratory cause. Recently the importance of the test as a Cardiac screening tool has become more prevalent and is used in Heart Failure patients as well as diagnosis of coronary heart disease (CHD).

The biggest growth in CPET testing has been seen in the Peri-operative sector where diagnostic CPET is used to assess the fitness level of prospective surgical patients, in an effort to better manage their post-operative care and thus improve surgical outcomes.

The test is known by various other names, including the Exercise Test and the Stress Test. However, they are, in essence, the same thing, measuring four main components. Including Heart Rate, which is done via a full 12 lead ECG, Oxygen Uptake, Carbon Dioxide output and Breathing rate, usually measured using a combined gas and flow analyser. Finally, the body will require some form of an exercise device. This may be any device, but in a hospital situation, it is usually a cycle ergometer, or possibly a treadmill.


Who might need a CPET test?

For many years, Cardiopulmonary Exercise Testing (CPET) has been used in two main areas. In hospitals it is predominantly used as a differential diagnosis tool, enabling the physician to determine the underlying cause of shortness of breath. Shortness of breath or Dyspnea can have many causes, some being respiratory such as COPD or Lung Cancer whilst other causes may be Cardiac such as Congestive Heart Failure, it is also possible for shortness of breath to be caused by a circulatory problem.

CPET also found favour in the sports and fitness arena, in particular as a tool to determine fitness by assessing the volume of Oxygen Output of a person under exercise (VO2).

More recently, obtaining a diagnosis from a body under exercise has been adopted by more and more specialists within the hospital environment. In areas such as cardiology, the CPET test has been shown to be a more useful diagnostic tool than the standard ECG stress test.

The use of CPET in the perioperative setting utilises the measurement to assess an individual’s fitness prior to surgery. This assessment is better allowing the surgical and anaesthetics teams to determine the person’s post-operative level of care. Dependant on the results of the test, an individual may not need to be referred directly to an ICU bed, but instead downgraded to an HDU bed or even directly back to the ward.

High-quality evidence shows that the fitter a person is prior to surgery, the shorter their stay, and the fewer complications are incurred throughout and postsurgery.


What does CPET involve?

Modern Cardiopulmonary Exercise Testing (CPET) is performed on a cycle ergometer, it is usually designed around a work protocol that ramps a subject to their maximum exercise tolerance, and the protocol will increase the effort required to pedal at a continuous rate, at a 5, 10, 15 watts per minute increase, or more for fitter individuals. The optimum workload ramp is between 8 and 12 minutes, so most protocols are designed to reach an individual’s max workload in 10 minutes.

The maximum workload for an individual can be calculated from their age, height and weight, but there’s also need to consider their current level of physical activity to determine their level of fitness. Creating a ramp that is too short may give too little data for interpretation, and a ramp that is too long can alter the result. A test should start with a 3-minute rest phase, followed by a 3-minute freewheel phase, and finally finish with 5 minutes of recovery, to ensure heart rate and breathing values normalise to the rest state.

Data for the test is recorded through a number of sensors. Usually, respiratory data is collected through a flow sensor connected to a facemask. It is also possible to use a mouthpiece, although this can be a little messier with saliva build-up at the end of the test. As mentioned before, Heart Rate is usually recorded via a 12 lead ECG, requiring 12 ECG electrodes placed around the subject’s chest. Other measurements that may be taken include Blood pressure, via an arm cuff and Pulse Oximetry via an ear sensor.

A good education for the subject is vital before a test, as patients can often misunderstand the results, thinking that a poor test proves that surgery is required. This is quite the opposite; the better the test results from a CPET test, the more likely the team will be happy to move a patient forward to surgery. This is because there is much less risk associated with carrying out surgery on fitter individuals.


Are there any risks?

Risks from Cardiopulmonary Exercise Testing (CPET) is minimal. The level of risk is comparable to carrying out mild to moderate exercise. However, the CPET test is performed in a controlled and managed environment, with trained staff on hand in the event of any problems. Less than one in a thousand patients experience some adverse reaction similar to that of a cardiology exercise test. During a CPET test, additional observations can be made including breathing patterns, Blood Pressure and Pulse Oximetry, alongside the full 12 lead ECG. If a patient exhibits any adverse symptoms, the test will be stopped immediately, and in the event of a problem, the Cycle Ergometer offers the safest option for the patient.


What information will be analysed?

All of the test data will be analysed by the clinical team to build a complete picture of the subjects overall health and fitness level. The analysis does not focus solely on the maximum level of exercise, although this is considered. It is also essential for the team to calculate the Anaerobic or Lactate Threshold, sometimes called the AT, at the point at which aerobic energy production is supplemented by anaerobic mechanisms, causing a sustained increase in lactate and metabolic acidosis. The AT is an excellent determinant of an individual’s fitness level, which can be improved with training.

It could be the case that someone with poor results is required to complete a safe exercise regime before surgery to reduce the risk and shorten the recovery time. Although more research is needed, many teams have been led to look at the advantages of ‘Prehabilitation’ or training prior to any surgical intervention, of which the current evidence suggests is largely beneficial to the patient’s wellbeing, during and after surgery. For more information about exercising prior to surgery, particularly heart surgery, click here. Around 8 million surgical procedures are performed in the UK each year with a low 2% complication rate. However, it’s possible that exercise regimes prior to surgical intervention performed more widely could lower the complication rate even further.


What to wear for the test

Simply consider Cardiopulmonary Exercise Testing (CPET) to be exercise, wear comfortable, loose-fitting clothes, training clothes if they are available and suitable footwear such as trainers, allowing the subject to perform the test to the best of their ability.


Before the test

Before visiting the hospital for a CPET test, some simple rules that should be followed, to avoid a poor result:

  • Don’t Eat – Subjects should be advised to avoid eating a minimum of 2 hours before the test.
  • No Alcohol – Subjects should be advised to avoid alcohol for a minimum of 4 hours before the test.
  • Avoid Exercise – Subjects should be advised not to perform any intense exercise before the test.
  • No Smoking – Subjects should be advised to avoid smoking a minimum of 1 hour before the test

Any and all medications should be discussed with the physician beforehand to determine if it can be used normally before the CPET test.


If the patient has experienced any of the following, they should contact the team performing the test.

  • Chest Pain on or just before the day of the test
  • Chest Infection on or up to 3 weeks before the test
  • Heart Attack or Stroke within 4 weeks
  • Recent surgery in particular Eye, stomach or chest
  • Attendance at A&E for any other reason within last week


Want to learn more?

We run a number of Cardiopulmonary Exercise Testing (CPET) Interpretation training courses each year which suit all levels and areas of speciality. So if you are keen to learn more about performing and interpreting CPET, why not drop us an email to education@lovemedical.com to find out when our next course is.